Deploy the SaaS application
Before you deploy the sample application to your SAP BTP Kyma runtime, please make sure you completed the previous tutorial chapters. Your Docker Images have to be available in your Container Registry, so Helm can access and pull them during the upcoming deployment.
The sample application can be deployed multiple times if either the Release Name, the Kyma Namespace or the Kyma Cluster are different. In the latter case, the cluster has to be in a different SAP BTP Subaccount (due to conflicting Role Collection names).
If you are facing any issues during the following steps of our tutorial, please feel free to consult the excellent Developer Tutorial on Deploy Your CAP Application on SAP BTP Kyma Runtime. It describes similar steps and will get you covered in great detail, in case you get stuck in our sample scenario.
https://developers.sap.com/mission.btp-deploy-cap-kyma.html
1. Introduction
The deployment of the Sustainable Saas solution to your SAP BTP Kyma Cluster is handled by Helm. To learn more about the basic concepts of Helm, visit the respective chapter of the tutorial (click here). Repeating myself, I also suggest to read and inhale the brilliant blog post of Maximilian Streifeneder on the topics of Kyma, Helm, Paketo and a lot more! It will give you a great overview and introduction if you are new to the Kubernetes, Docker and Kyma world!
Furthermore, if you are facing any issues during the following steps of our tutorial, please feel free to consult the excellent Developer Tutorial on Deploy Your CAP Application on SAP BTP Kyma Runtime. It describes similar steps and will get you covered in great detail, in case you get stuck in our sample scenario.
https://developers.sap.com/mission.btp-deploy-cap-kyma.html
Before you proceed with the following steps, please make sure you have successfully built your Docker Images and pushed them to the Container Registry of your choice (e.g., Docker Hub or GitHub). Helm will not make use of your local Docker Images, but will pull the latest Images from the provided registry and deploy them to your Kyma Cluster.
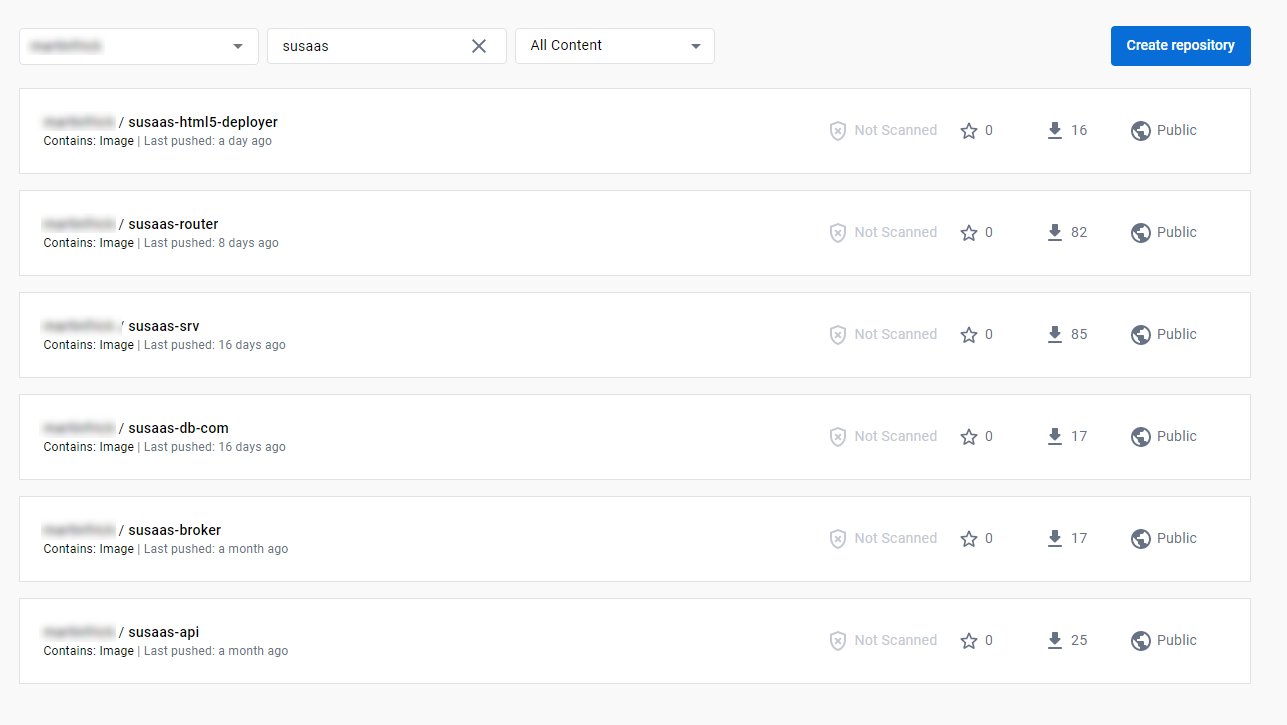
The following Docker Images should be available in your Container Registry:
- susaas-srv - Backend CAP Service
- susaas-api - API CAP Service
- susaas-broker - API Service Broker
- susaas-router - Application Router
- susaas-db-com - Shared Database Deployer
- susaas-html5-deployer - HTML5 Apps Deployer
Here a sample screenshot taken from Docker Hub.
During Deployment, Helm will generate the required Kubernetes resources (manifest files) based on the provided Helm templates (again - feel free to check out our Helm Introduction) and deploy them to your Kyma Cluster. This will result in various different objects like Deployments, Jobs or SAP BTP Service Instances or Bindings.
:::hint Hint To learn more about all the various Kyma and native Kubernetes resources utilized by our sample application, please check out the respective deep-dive chapters (click here)! :::
Kubernetes Deployments
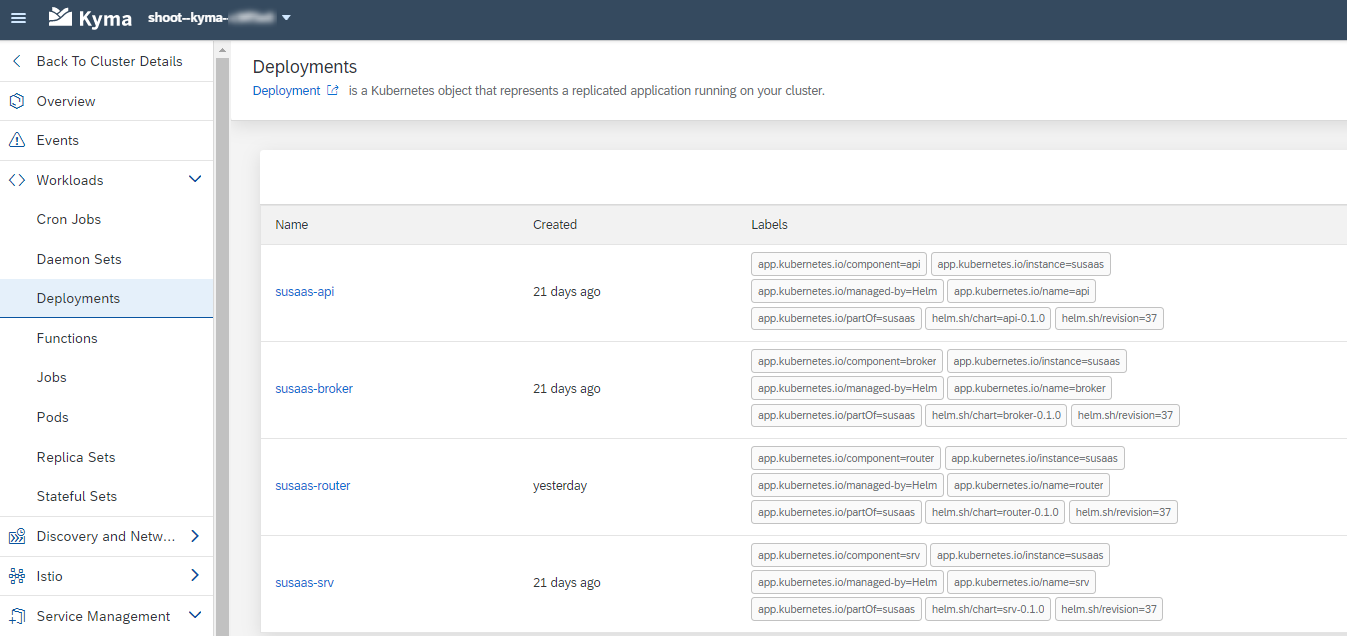
- susaas-srv
- susaas-api
- susaas-broker
- susaas-router
These workloads are constantly running in your Cluster after deployment, as they need to be contiguously reachable for external traffic. They come with further components like API Rules or Istio related configurations, which are explained in further detail as part of our dedicated Kyma tutorial (click here).
Kubernetes Jobs
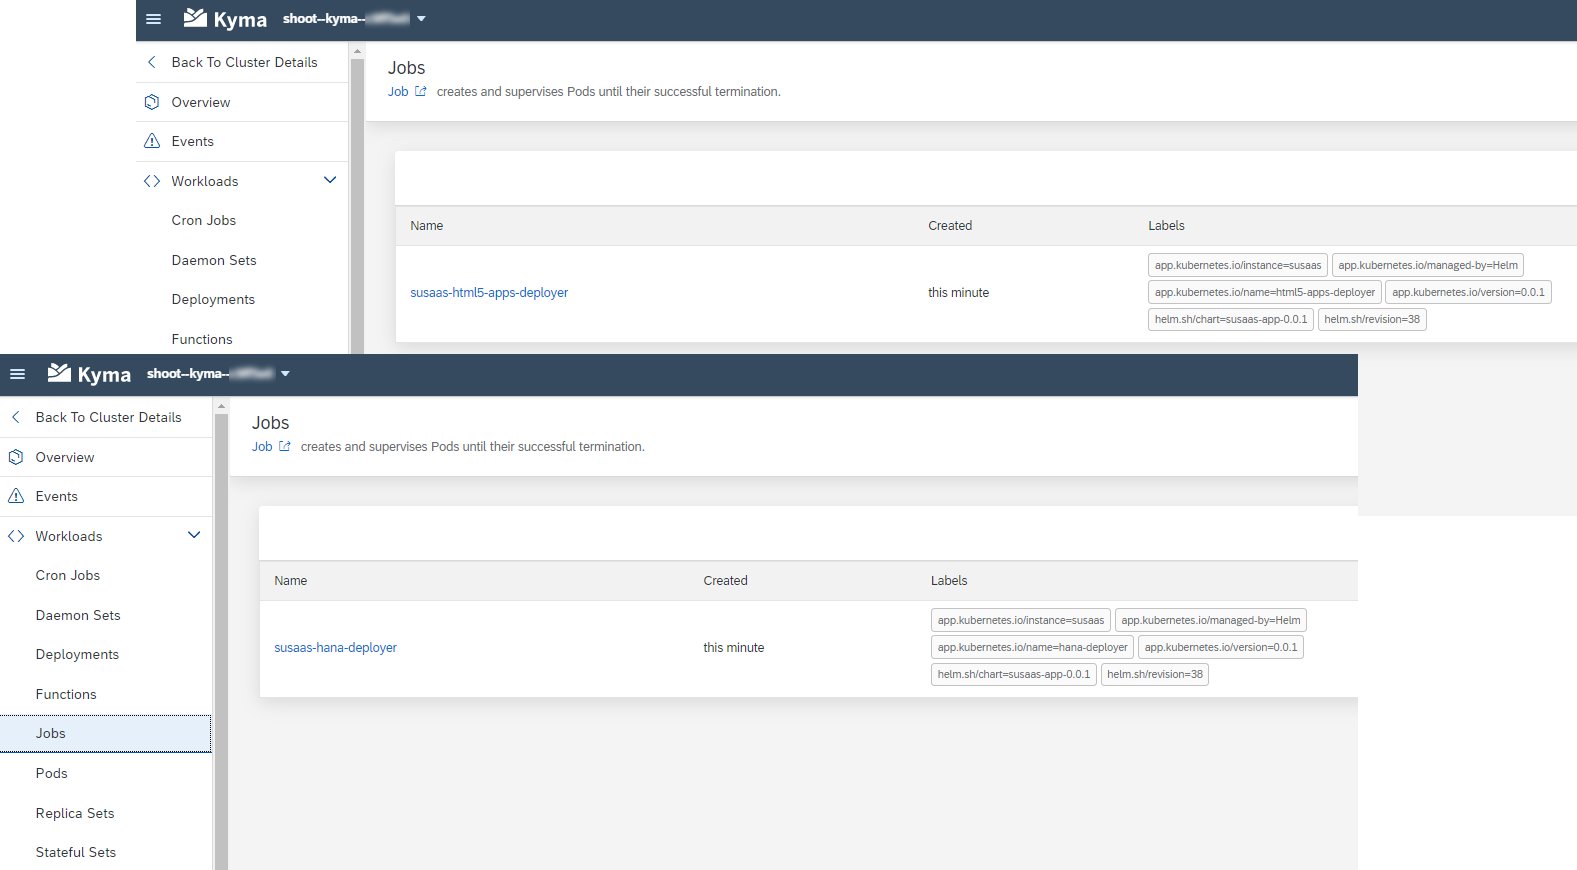
- susaas-hana-deployer
- susaas-html5-apps-deployer
The deployment of the shared data model using the Node.js based HDI Deployer is only required upon initial setup or when any changes are applied to the data model. The same applies for the static UI5 modules. This is why, both applications components are running as Jobs whenever a helm install or helm upgrade is initiated. After the Jobs finished successfully, they are deleted from the Cluster again.
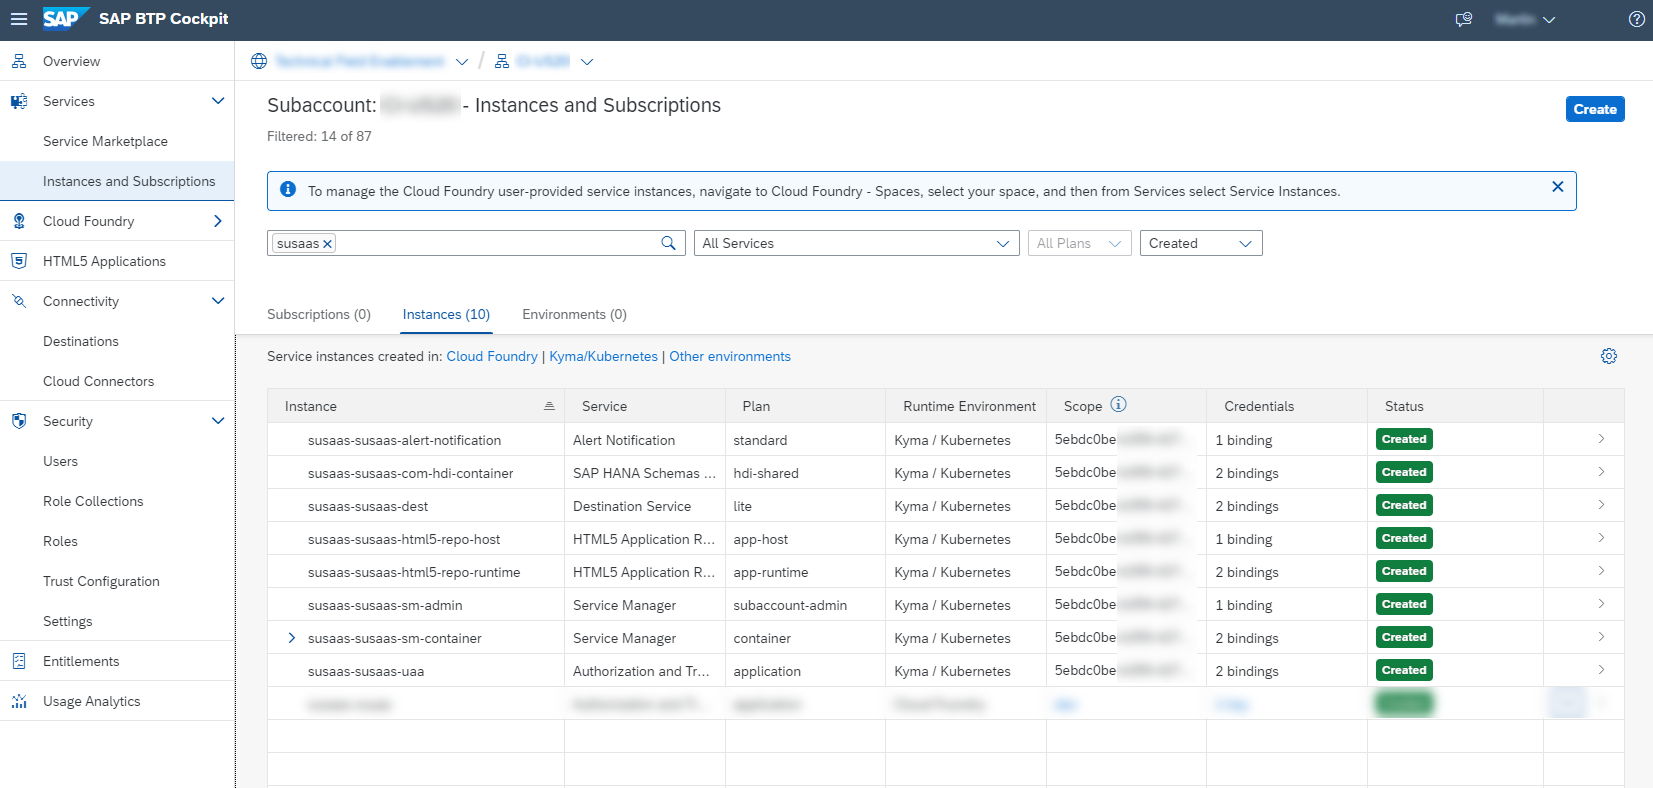
SAP BTP Service Instances/Bindings
The Helm deployment will create a list of SAP BTP Service Instances and corresponding Service Bindings required by your workloads. While these Service Instances can also be seen from within the SAP BTP Cockpit, the Service Credentials can only be retrieved and accessed from your Kyma Dashboard.

SAP BTP Service Bindings will create corresponding Kyma Secrets, which are consumed by your Kubernetes workloads (Pods, Jobs) and allow your applications to communicate with the respective SAP BTP Service Instances like you know it from the Cloud Foundry context. Npm packages like @sap/xsenv (see here) natively support these kind of Service Bindings in Kyma and Cloud Foundry. Check out Max Streifeneder's blog post (click here), who also provides a great summary of this concept (just search for "How does CAP know where to get the service binding information from?").
2. Create a new Kyma namespace
Using Helm, you can deploy the SaaS sample application to either the default Kyma namespace or create a new namespace of your choice for this sample application. In the following, you will learn how to create a new namespace called susaas in Kyma.
2.1. First of all, please install the kubectl command line tool to your local device. Kubectl allows you to interact with your Kyma Cluster from your command line, as you are used to from any other Kubernetes environment. Click here to find further information about kubectl. Helm will make use of kubectl during the deployment process to create the required resources in your Cluster.
Installation Shortcuts MacOS - brew install kubectl Windows - choco install kubernetes-cli
To learn more about kubectl commands check the official documentation and the kubectl cheat sheet. Learning how to use kubectl is one of the most essential requirements when starting off with Kubernetes and Kyma. The command syntax is quite simple to understand and follows a consistent pattern. So don't shy to have a little deep-dive into the provided documentations. It pays!
2.2. Before you continue with the next step, make sure you can successfully execute the following command. This proves that kubectl has been successfully added to your Environment Variables. In case of errors, please try again from a new command line instance and make sure you followed all steps in the installation instructions provided.
> kubectl version

Client Version: version.Info{Major:"1", Minor:"26", ...
2.3. To connect to your Kyma Cluster, you have to install another tool called kubelogin. Please use the below shortcuts or the installation details in the linked documentation to proceed.
Installation Shortcuts MacOS - brew install int128/kubelogin/kubelogin Windows - choco install kubelogin
Check the successful installation by running the following command.
> kubelogin

kubelogin version v1.26.0
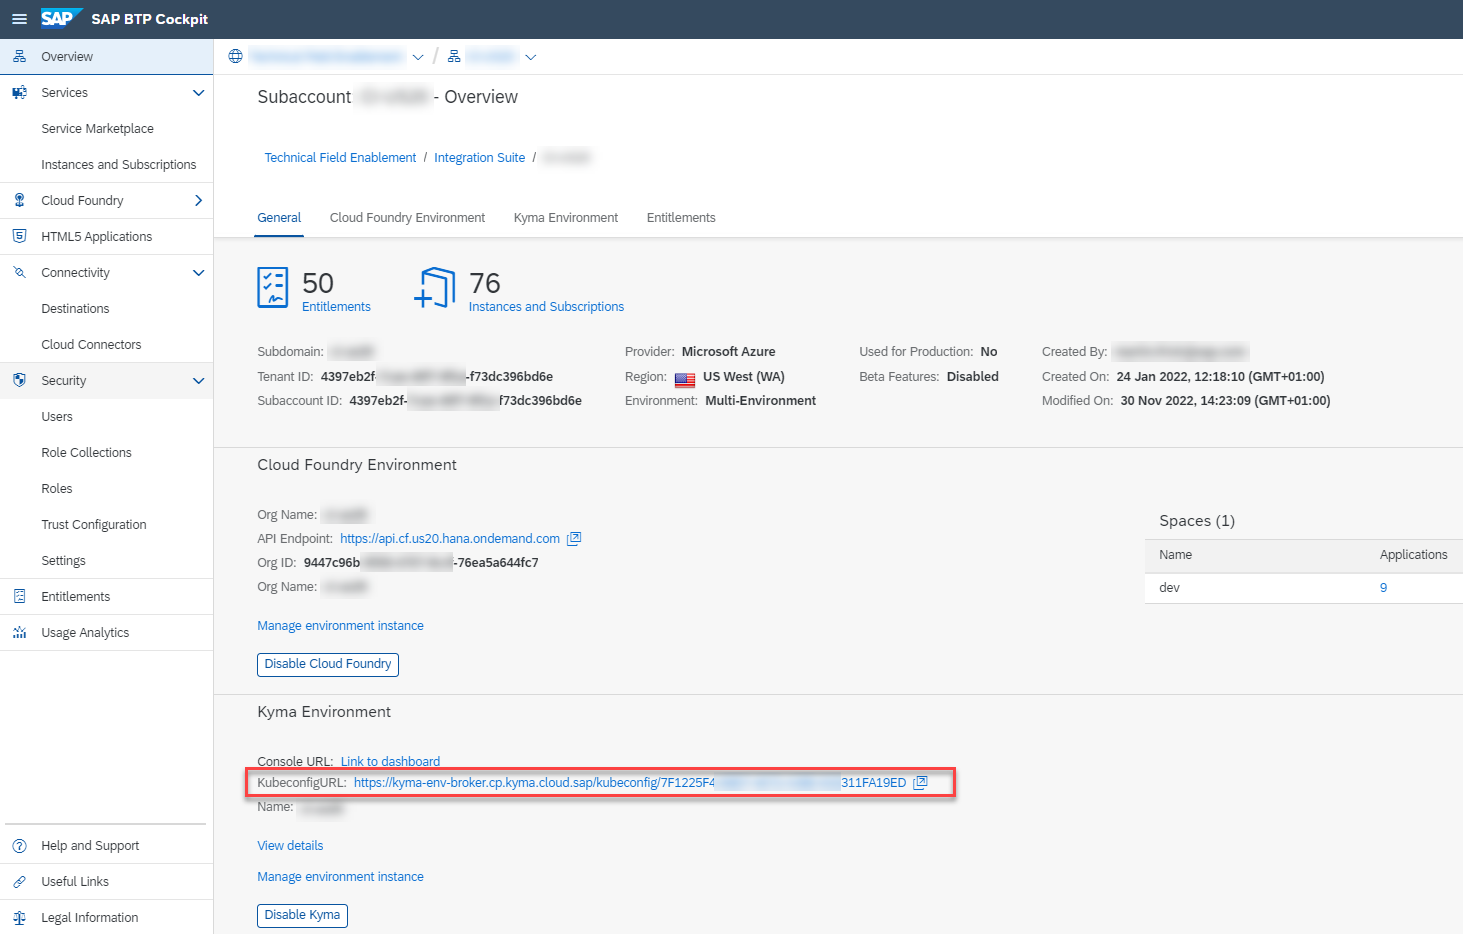
2.4. Download the so-called kubeconfig file associated to your Kyma Cluster from your SAP BTP Cockpit. You can find it in your SAP BTP subaccount Overview section. This file contains all the required access details and credentials so that kubectl can connect to your Kyma Cluster.
Do not share this file with anyone else and do not commit it to your GitHub repository.
2.5. Once you downloaded the kubeconfig.yaml file, please store it as a file named config (! without any file name extension !) in your hidden $HOME/.kube directory. Kubectl will check this hidden directory for an available configuration file named config. This is probably the most convenient way to provide your Cluster access details to kubectl.
In Windows, the directory is e.g., C:\Users\<Username>\.kube
Alternatively, you can also configure the location of your configuration file in the environment variable KUBECONFIG or by adding the kubectl parameter --kubeconfig to any kubectl command (which is obviously a bit cumbersome).
EXPORT KUBECONFIG=/sample/path/config

kubectl get pods --kubeconfig=/sample/path/config
If you are facing issues in this step of the tutorial, feel free to consult the excellent Developer Tutorial on Deploy Your CAP Application on SAP BTP Kyma Runtime, which describes this step in further detail!
https://developers.sap.com/tutorials/btp-app-kyma-prepare-dev-environment.html
If you have to manage multiple Kyma or Kubernetes Clusters, make sure to research the kubectx command line tool (https://github.com/ahmetb/kubectx)! It provides you a very convenient way to switch the context between various clusters.
2.6. Run the following command to check whether kubectl can successfully connect to your cluster using the respective config file.
Depending on your landscape, you will need to setup Two-Factor-Authentication using e.g., the SAP Authenticator App.
> kubectl cluster-info

Kubernetes control plane is running at https://api.a1b2c3d4.kyma.ondemand.com
2.7. The following command, finally allows you to create a new namespace in your Kyma cluster. To learn more about kubectl commands check the official documentation and the kubectl cheat sheet.
This is just a sample for your reference. If you want, you can deploy the sample application also to the Kyma default namespace or any other namespace of your choice!
> kubectl create namespace susaas

namespace/susaas created
2.8. Use the following command, to enable the Istio Sidecar Injection for your new namespace. Istio is one of the most popular Service Mesh offerings for Kubernetes and manages Cluster-internal communication as well as external access to your workloads! We highly recommend to learn more about Istio Service Mesh, by visiting the respective part of the tutorial. The features and possibilities are mind-blowing compared to what you can do in a Cloud Foundry scenario!
If you plan to use an existing namespace, make sure this label is configured and if necessary, please update the namespace using kubectl or the Kyma Dashboard!
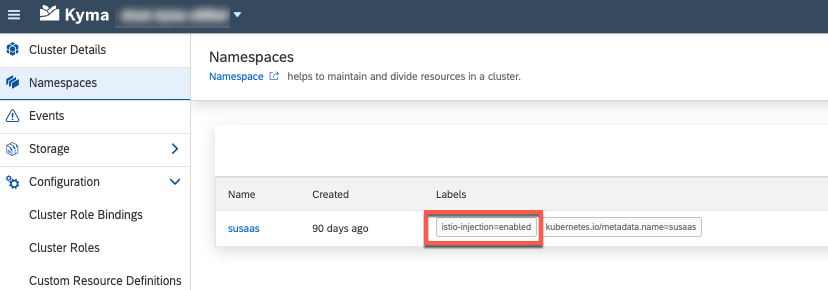
kubectl label namespace susaas istio-injection=enabled
You can either use kubectl or check in you Kyma Dashboard, whether the label has been successfully set!
Here you can see another kubectl command called describe, giving you more information (than a pure get) about a certain object like in this case our namespace.
> kubectl describe namespace susaas

Name:         susaas
Labels:       istio-injection=enabled
              kubernetes.io/metadata.name=susaas
2.9. To delete a namespace, just execute the following kubectl command. Already getting an idea about how the kubectl commands are structured? Great!
Be extremely cautious when deleting a namespace containing a SaaS application with active subscribers. This can result in very cumbersome situations, where SAP BTP Service Instances like XSUAA can only be deleted with complex additional effort. Before you delete a namespace or uninstall a Helm Release, always make sure there are no more active subscribers!
> kubectl delete namespace susaas

namespace/susaas deleted
Okay great, by now you should be equipped with either a new namespace or the default Kyma namespace. So let us prepare the SaaS sample application for deployment next.
3. Prepare the Helm deployment
Let's get started with the preparation of our Helm deployment or Helm installation. Based on your own Kyma environment, you will need to update the values.yaml file of your Umbrella Chart. This is a regular process step, which you need to undertake as part of almost any Helm installation to inject environment-specific details which cannot be pre-configured by the application/package vendor.
3.1. Open the Umbrella Chart values.yaml file (of our SaaS sample application) in the code/charts/sustainable-saas directory (click here).
3.2. Provide values for the following parameters, based on your own environment and the Container Registry used.
global
imagePullSecret - Name of a Image Pull Secret if required.
Hint This value needs to contain the reference to a potential Image Pull Secret of your Container Registry. If you're using a free Docker Hub account and public Docker Images, this property can be left unchanged. This is probably the easiest approach if you are new to Docker and Kubernetes. Otherwise, please make sure to create a Kyma Secret containing your imagePullSecret and provide the reference to your Secret here.
Find more details in the following blog post (click here) or check out the Deploy Your CAP Application on SAP BTP Kyma Runtime tutorial in the SAP Tutorial Navigator(click here). Our colleagues will get you covered!
domain - Your Kyma Cluster default or custom domain.
Hint This parameter requires your default Kyma cluster domain (e.g. a1b2c3d4.kyma.ondemand.com). To get the default domain of your Kyma Cluster you can run the following kubectl command:
kubectl get configMaps/shoot-info -n kube-system -o jsonpath='{.data.domain}'This will return the required result like a1b2c3d4.kyma.ondemand.com. a1b2c3d4 is a placeholder for a string of characters that’s unique for your cluster (the so-called shootName which we need in the next step).
shootName - The unique shoot name of your Kyma Cluster.
Hint As Kyma is based on Gardener, the managed Clusters are also called Shoot-Clusters (flower analogy). In our sample the shootName parameter, ensures the uniqueness of application registered in the SAP BTP SaaS Registry. As the SaaS application names registered in the SaaS registry need to be unique across a SAP BTP region (e.g. eu10), the shootName of your Kyma cluster will be part of that SaaS application names. This ensures you are not colliding with any other developer deploying the sample application. To get the shootName of your Kyma Cluster, run the following kubectl command:
kubectl get configMaps/shoot-info -n kube-system -o jsonpath='{.data.shootName}'.In a productive SAP BTP landscape, your shootName will always starts with a letter like a1b2c3d4 or with the prefix c- like c-1b2c3d4*.
gateway - The Istio Ingress Gateway to be used.
Hint This value only has to be changed if your Istio setup deviates from the default setup. For example, if you are using a custom domain and you have set up a new Istio Ingress Gateway for this domain. In that case, please update the respective property accordingly. For the Basic Version, you should be fine leaving the parameters unchanged.
api - Details of the API Service workload.
Hint These values only need to be changed if your setup deviates from the default sample configuration. This is the case if you intentionally set a different fullName property for your API Service or expose a custom hostname. For the Basic Version, you should be fine leaving the parameters unchanged.
broker - Details of the Service Broker workload.
Hint These values only need to be changed if your setup deviates from the default sample configuration. This is the case if you intentionally set a different fullName property for your Service Broker or expose a custom hostname. For the Basic Version, you should be fine leaving the parameters unchanged.
router - Details of the Application Router workload.
Hint These values only need to be changed if your setup deviates from the default sample configuration. This is the case if you intentionally set a different fullName property for your Application Router or expose a custom hostname. For the Basic Version, you should be fine leaving the parameters unchanged.
router
image.repository - Provide the details of your Application Router Docker Image like \<username>/susaas-router if your Image is stored in Docker Hub or ghcr.io/\<namespace>/susaas-router in case of GitHub. For other Container Registries, please check the respective provider documentation.
image.tag - Provide a different tag, if you do not want to use the latest image (default).
srv
- image.repository - Provide the details of your Backend Service Docker Image repository like \<username>/susaas-srv if your Image is stored in Docker Hub or ghcr.io/\<namespace>/susaas-src in case of GitHub. For other Container Registries, please check the respective provider documentation.
- image.tag - Provide a different tag, if you do not want to use the latest image.
api
image.repository - Provide the details of your API Service Docker Image repository like \<username>/susaas-api if your Image is stored in Docker Hub or ghcr.io/\<namespace>/susaas-api in case of GitHub. For other Container Registries, please check the respective provider documentation.
image.tag - Provide a different tag, if you do not want to use the latest image (default).
apim - For now, do not provide any values for this section and keep the integration Disabled. The integration of SAP API Management will be explained as part of the Advanced Version (click here).
broker
image.repository - Provide the details of your API Service Broker Docker Image repository like \<username>/susaas-broker if your Image is stored in Docker Hub or ghcr.io/\<namespace>/susaas-broker in case of GitHub. For other Container Registries, please check the respective provider documentation.
image.tag - Provide a different tag, if you do not want to use the latest image (default).
config.serviceId + planId(s) - You can provide unique GUIDs (e.g., 332e966f-a1ab-a2ab-a3ab-b9facec65bad) for your service plans and the broker instance itself. If you do not provide any GUIDs, they will be auto-generated by Helm upon deployment!
While auto-generating the GUIDs is fine for testing purposes, in a productive scenario those GUIDs must remain constant after first deployment. Therefore, we recommend to generate GUIDs upfront using your command line or available generators and providing them right here.
hana_deployer
- image.repository - Provide the details of your HDI Container Deployer Docker Image repository like \<username>/susaas-db-com if your Image is stored in Docker Hub or ghcr.io/\<namespace>/susaas-db-com in case of GitHub. For other Container Registries, please check the respective provider documentation.
- image.tag - Provide a different tag, if you do not want to use the latest image (default).
html5_apps_deployer
- image.repository - Provide the details of your HTML5 Apps Deployer Docker Image repository like \<username>/susaas-html5-deployer if your Image is stored in Docker Hub or ghcr.io/\<namespace>/susaas-html5-deployer in case of GitHub. For other Container Registries, please check the respective provider documentation.
- image.tag - Provide a different tag, if you do not want to use the latest image (default).
destination
- parameters.init_data.instance.destinations
Hint Feel free to update the SAPUI5 version used by the ui5 destination.
3.3. Before running the respective Helm commands to generate the Kubernetes resource definitions, please configure the redirect-uris of you xs-security.json (click here). In the oauth2-configuration section, please provide your default Cluster Domain or your Custom Domain (if configured). Keep the localhost redirects for local testing purposes.
Use the following kubectl command to get your default Cluster domain
kubectl get configMaps/shoot-info -n kube-system -o jsonpath='{.data.domain}'
"oauth2-configuration": {
  "token-validity": 900,
  "redirect-uris": [
    "https://*.a1b2c3d4.kyma.ondemand.com/**", // <<- Replace a1b2c3d4.kyma.ondemand.com with your default Cluster Domain or Custom Domain
    "http://*.localhost:5000/**",
    "http://localhost:5000/**"
  ],
  "credential-types": [
    "binding-secret",
    "x509"
  ]
}
3.4. Wow, that was quite some work but luckily this is a one-time action. Let's relax and check if your Kubernetes resource definitions are successfully generated by Helm, running the following command within the code directory.
In case of errors, check if you maybe missed one of the above parameters or a mistake (like a space or special character) has slipped in.
helm template ./charts/sustainable-saas
This will log the generated yaml files in your console. If required, you can also store the results into a local file by running the following command.
helm template ./charts/sustainable-saas > helm-template.yaml
Double-check if the correct Docker Image repositories can be found in the generated resource definitions before you continue with the next chapter.
apiVersion: apps/v1
kind: Deployment
metadata:
  labels:
    app.kubernetes.io/name: broker
  name: release-name-broker
spec:
  selector:
    matchLabels:
      app.kubernetes.io/name: broker
  template:
    metadata:
      labels:
        app.kubernetes.io/name: broker
    spec:
      containers:
      - image: sap-demo/susaas-broker:latest # <---
        name: broker
4. Deploy to your Kyma Cluster
While we could have skipped the whole part of building your own Docker Images and updating most of the values.yaml parameters, it is essential to understand both process steps! If you would like to apply any changes to the provided sample application, this is the actual way to proceed. Okay, but finally you should now be all set to deploy the sample application (based on your own Docker Images) to your Kyma Cluster.
4.1. First of all, deploy a SAP Alert Notification Service instance to your namespace of choice. Before doing so, please update the recipient e-mail address for the respective notifications in the values.yaml file (./charts/alert-notification/values.yaml).
# SAP Alert Notification Service
alert_notification:
  fullnameOverride: alert-notification
  serviceOfferingName: destination
  servicePlanName: lite
  parameters:
    configuration:
      actions:
        - name: send-email
          properties:
            destination: john.doe@example.com # Update to your receiver e-mail address
          state: ENABLED
          type: EMAIL
  ...
In case of SAP BTP Trial Account usage, please make sure to change the servicePlanName to lite!
4.2. Save your changes and deploy the Alert Notification Service Instance to your desired Kyma Namespace, by running the following Helm command from within the code directory.
There can only be one Alert Notification Service instance per Kyma Namespace (or Cloud Foundry Space). Given this restriction, SAP Alert Notification Service is deployed as a standalone Helm installation in our example. Binding that Service Instance to the lifecycle of our SaaS application might conflict with other applications also requiring Alert Notification Service in the same namespace.
You might be asked to re-login to your Cluster using Multi-Factor-Authentication, when running helm commands from time to time.
helm install alert-notification ./charts/alert-notification --namespace <namespace>
4.3. After the Alert Notification Service has been deployed (wait for a confirmation in the console or check the Helm Release status in the Kyma Dashboard), please run the following command from within the code directory to deploy the Sustainable SaaS sample application to a namespace of your choice.
Feel free to add the --debug parameter to get some more verbose output if you're interested what's happening under the hood!
helm install susaas ./charts/sustainable-saas --namespace <namespace> (--debug)
An alternative approach using the helm upgrade command would look as follows. This will either upgrade an existing installation of our SaaS sample application or install a new version if not available in the respective namespace yet.
helm upgrade susaas ./charts/sustainable-saas --install --namespace <namespace> (--debug)
4.4. The deployment of the Helm Release to your Kyma cluster, will take a few minutes.
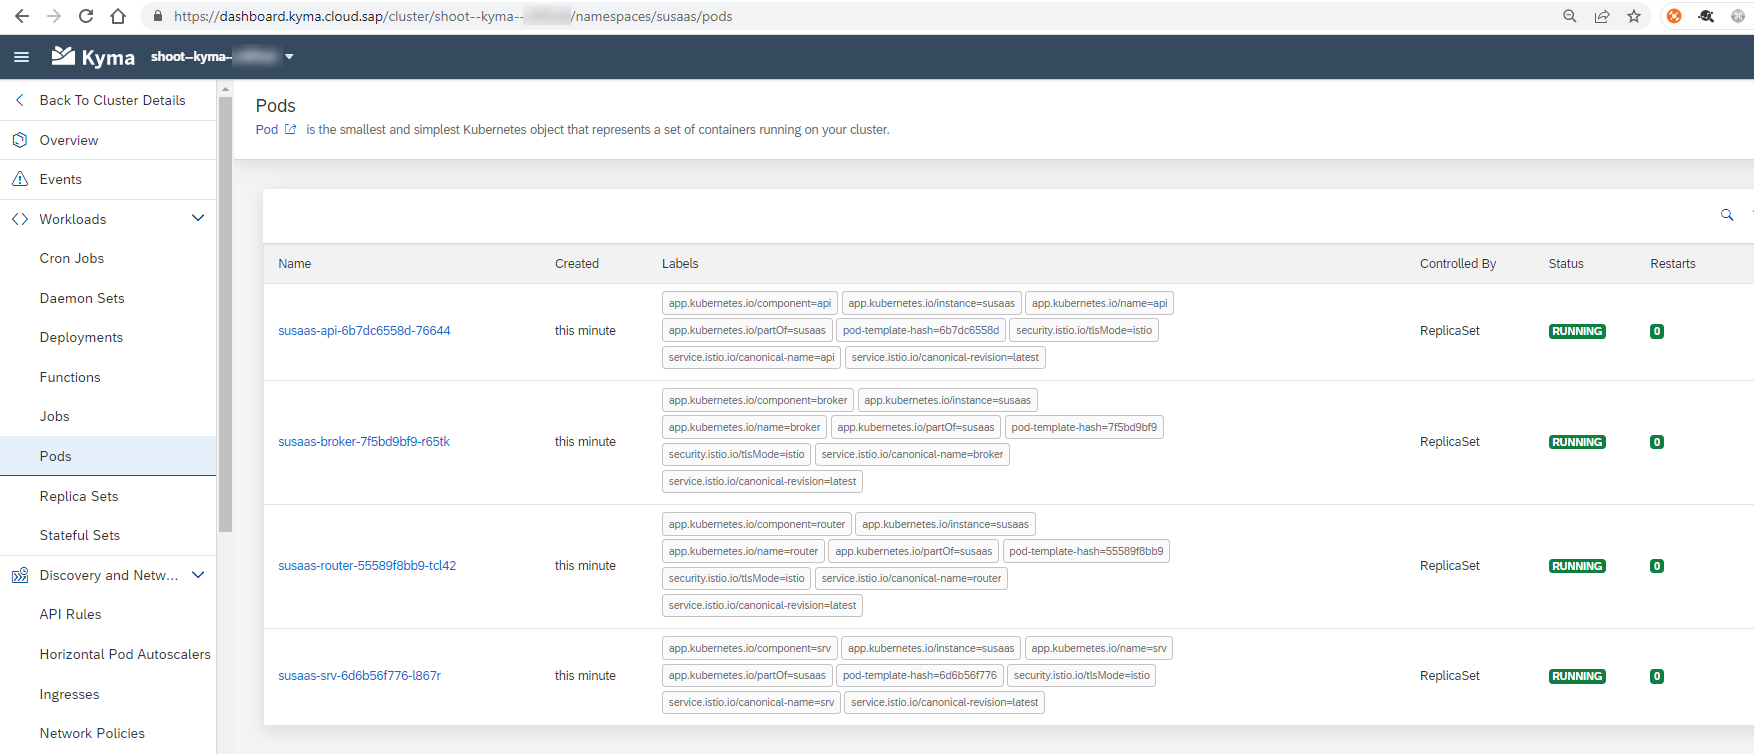
4.5. You can use this time to switch back to your Kyma Dashboard, where you can monitor the installation/deployment progress and respective objects being instantiated. Once you see the following four Pods in Running state, your deployment finished successfully.
Trivia - We're kind of mixing up the terms Deployment/Installation/Release in this tutorial.
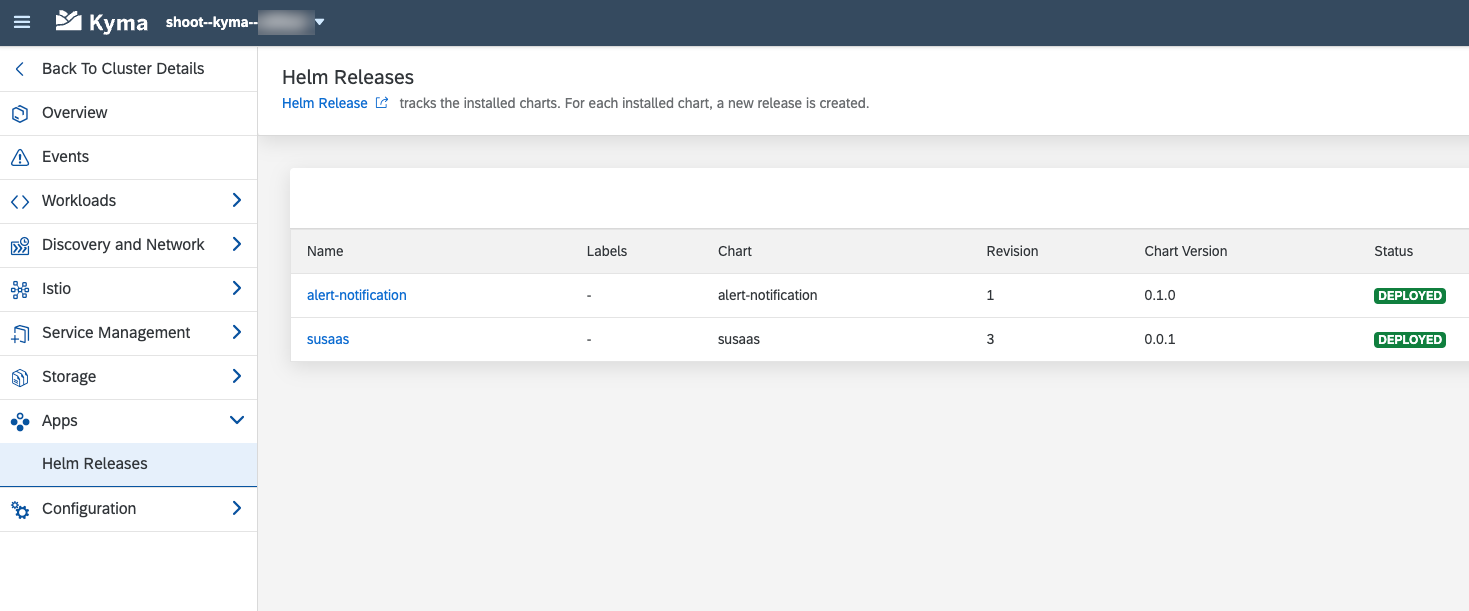
4.6. You can also check the successful deployment of your application in the Apps section of the Kyma Dashboard. Here you can find all Helm Releases.
4.7. For any further updates of the Helm Release, you must now use the helm upgrade command (already mentioned above).
helm upgrade susaas ./charts/sustainable-saas --namespace <namespace> (--debug)
4.8. To undeploy/uninstall a Helm Release, you can use the following command.
Please make sure to check the respective Undeploy chapter of the documentation first! Uninstalling a SaaS application with existing subscribers, can result in corrupt Service Instance setups which are very cumbersome to resolve.
helm uninstall susaas --namespace <namespace>
5. Multiple Deployments
The sample application has been designed for multiple deployments in the same Kyma Namespace using different Release Names (e.g., susaas-dev, susaas-test, susaas-prod). If required, the sample application can also be deployed to different Kyma Namespaces using the same Release Name (e.g., susaas in default namespace, susaas in test namespace).
The (Helm) Release Name, is the value following the helm install command. You can have multiple releases based on the same Helm Chart if required.
helm install susaas-dev ./charts/sustainable-saas --namespace <namespace> (--debug)
- 1 ** n installations with different Release Names (using the same Kyma Namespace)
- 1 ** n installations in different Kyma Namespaces (using same Release Name)
Please note, you can not deploy the application to equally named namespaces in different Kyma Clusters of the same SAP BTP subaccount. In this case, the Role Collection names will collide. Still, feel free to cover this requirement yourself by adapting the Role Collection name logic.
The respective Kyma Namespace and Release Name will be part of your xsappname and also part of your SAP BTP Role Collections. To ensure the uniqueness of applications registered in the SAP BTP SaaS Registry Service, please make sure to provide the correct shootName property in your values.yaml file! The same application name can only be registered once in the same SAP BTP region (e.g., eu10).